Sunday, 20 June 2010

Batch GIMP script for auto-sharpen, white-balance and colour enhance

Like you, my point-and-shoot camera in auto-ISO mode often, if not always, gives me pictures which need a little adjustment to realise their full potential.

In GIMP, I usually use the 'auto white balance' option which usually gives great results. Often, I also use the 'auto color enhance' option and, occasionally, I use a simple filter to sharpen the features in the image.

Here's a GIMP script which will automate the process for a folder of pictures There are four input parameters. The first is the 'pattern' to find the files, e.g. "*.tiff" gives you all the tiff files in the directory. The next three inputs refer only to the sharpening filter. I use the (confusingly named) 'unsharp' filter which works by comparing using the difference of the image and a gaussian-blurred version of the image.

'radius' (pixels) of the blur (>1, suggested 5)
'amount' refers to the strength of the effect (suggested 0.5)
'threshold' refers to the pixel value beyond which the effects are applied (0 - 255, suggested 0)

These require a little bit of trial and error, depending on the type of picture. In the command line, the script is called like this:

 gimp -i -b '(batch-auto-fix "*.JPG" 5.0 0.5 0)' -b '(gimp-quit 0)'  


An obligatory example. Before:
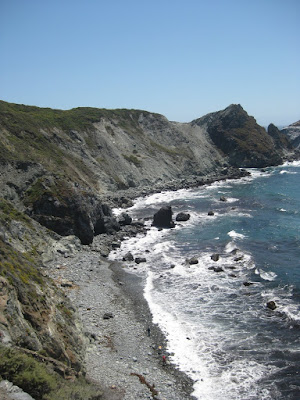


and after:


Enjoy!

Sunday, 6 June 2010

Convert movies to be compatible with ZEN X-Fi media player

Creative - another company which doesn't provide support for non-Windows users. Get with the times, losers!

The ZEN player needs a specific format of movie (bit-rate and aspect ratio). Here's how to do it with mencoder (available for free on all platforms)

 mencoder 'MyMovie.avi' -oac mp3lame -lameopts cbr:mode=2:br=96 -af resample=44100 -srate 44100 -ofps 20 -ovc lavc -lavcopts vcodec=mpeg4:mbd=2:cbp:trell:vbitrate=300 -vf scale=320:240 -ffourcc XVID -o MyMovie4zen.avi  

Granular Therapy

Here's a relaxing movie I just made of spinning modelled sand grains:


I'm not going to divulge the details of the model of how to create the sand grains (a current research project of mine). I can tell you I used these rather excellent functions for MATLAB:

Volume interpolation Crust algorithm, described more here

A toolbox for Multi-Parametric Optimisation

I used 'recordmydesktop' to capture the grains in my MATLAB figure window. It created an OGV format video (which I renamed to 'beautiful_grains.ogv'). I then used the following code to decode the video into jpegs

 mkdir out_pics  
mplayer -ao null -ss 00:00:03 -endpos 50 beautiful_grains.ogv -vo jpeg:outdir=out_pics


I needed to crop the pictures to just the grains, then turn the cropped pictures back into a video. I used this:

 cd out_pics  
for image in *.jpg
do
# crop the image
convert $image -crop 600x600+350+135 grains%05d.tiff
done
# make movie from the cropped tiffs
ffmpeg -r 25 -i grains%05d.tiff -y -an spinning_grains_small.avi


et voila! Now sit back with a cuppa and relax to those spinning grains.

Saturday, 5 June 2010

Updated Power Spectrum from an Image

A while back I posted on using ImageMagick to do a full frequency-decomposition on an image, and create a power spectrum. It had several inaccuracies. Here's an update with how to do it better

First, you need to install a version of IM which is HDRI enabled (see here)

# test for valid version of Image Magick
 im_version=`convert -list configure | \  
sed '/^LIB_VERSION_NUMBER /!d; s//,/; s/,/,0/g; s/,0*\([0-9][0-9]\)/\1/g'`
[ "$im_version" -lt "06050407" ] && errMsg "--- REQUIRES IM VERSION 6.5.4-7 OR HIGHER ---"


# test for hdri enabled
 hdri_on=`convert -list configure | grep "enable-hdri"`  
[ "$hdri_on" = "" ] && errMsg "--- REQUIRES HDRI ENABLED IN IM COMPILE ---"


#read $file, load and converting to greyscale
 convert $file -colorspace gray in_grey.tiff  


# crop image to smallest dimension
 min=`convert in_grey.tiff -format "%[fx: min(w,h)]" info:`  


# crop image, and convert to png (why?)
 convert in_grey.tiff -background white -gravity center -extent ${min}x${min} in_grey_crop.png  


# get data, find mean as proportion, convert mean to percent, and de-mean image
 data=`convert in_grey_crop.png -verbose info:`  
mean=`echo "$data" | sed -n '/^.*[Mm]ean:.*[(]\([0-9.]*\).*$/{ s//\1/; p; q; }'`
m=`echo "scale=1; $mean *100 / 1" | bc`
convert in_grey_crop.png -evaluate subtract ${m}% in_grey_crop_dm.png


# pad to power of 2
 p2=`convert in_grey_crop_dm.png -format "%[fx:2^(ceil(log(max(w,h))/log(2)))]" info:`  
convert in_grey_crop_dm.png -background white -gravity center -extent ${p2}x${p2} in_grey_crop_dm_pad.png


# fft
 convert in_grey_crop_dm_pad.png -fft in_ft.png  


# get spectrum
 convert in_ft-0.png -contrast-stretch 0 -evaluate log 10000 in_spec.png  


... but it's still not quite right. Any tips?

Turn your OGV movie section into a cropped animated GIF

An example from a recent project

 # make directory for output jpg  
mkdir out_pics
# section to the ogv video file into jpegs
mplayer -ao null -ss 00:00:03 -endpos 50 beautiful_movie.ogv -vo jpeg:outdir=out_pics
cd out_pics
# loop over each image and crop into desired rectangle
for image in *.jpg
do
convert $image -crop 600x600+350+135 "$image crop.tiff"
done
# turn into an animated gif
convert -page 600x600+0+0 -coalesce -loop 0 *.tiff beautiful_animation.gif

Miscellaneous useful bash

For my benefit more than anything - things I use over and over again, but do not have the mental capacity to remember

# number of files in current directory
 ls -1R | grep .*.<file extension> | wc -l  


# check if you have a program installed
 aptitude show <name of program> | grep State  


# only list the (sub-)directories in your current directory
 ls -l | grep ^d  


# remove backup files
 find ./ -name '*~' | xargs rm  


# use zenity get the directory where the file you want is
 zenity --info --title="My Program" --text="Select  
which directory contains the file(s) you want"
export target_dir=`zenity --file-selection --directory`


# list all txt files in this directory
 x=$( ls $target_dir | grep .*.txt |sort|zenity --list --title="Select" --column="coordinate file" )  


# get this directory
 export raw_dir=`zenity --file-selection --directory`  


# removes .txt (for example, for later use as start of filename)
 str="$x"  
Var1=`echo $str | awk -F\. '{print $1}'`


# gets the rest of the file name
 str="$Var1"  
Var2=`echo $str | awk -F\- '{print $2}'`


# turn string into (indexable) array
 e=$(echo $mystring | sed 's/\(.\)/\1 /g')  
b=($e)


# get max and min dimensions of an image
 min=`convert image1.tiff -format "%[fx: min(w,h)]" info:`  
max=`convert image1.tiff -format "%[fx: max(w,h)]" info:`


# take away 1 from both
 min=$((min-1))   
max=$((max-1))

Unlock the power of ImageMagick to HDRI

My primary motivation to do this has been to use ImageMagick for Fast Fourier Transforms, which have a myriad of applicability in image processing and filtering

First, you have to install perlmagick. Using apt,
 sudo apt-get install perlmagick  


Then the perl libraries
 sudo apt-get install libperl-dev  


Install the rather magnificent fftw libraries
 sudo apt-get install libfftw3-dev fftw-dev  


wget the source code, untar, move it, cd home
 wget ftp://ftp.imagemagick.org/pub/ImageMagick/ImageMagick.tar.gz   
tar xvfz ImageMagick.tar.gz
mv ImageMagick-6.6.0-8 $HOME
cd $HOME/ImageMagick-6.6.0-8


Install (see here for instructions)
 make distclean   
./configure --enable-hdri LDFLAGS='-L/usr/local/lib -R/usr/local/lib'


see also here for a bug fix, and also see here for instructions

make & sudo make install
make check


To see whether the fft commands are working properly, you could issue the following:
 if [ -s lena.png] #check to see if the file exists  
then
# do fft and ifft roundtrip
convert lena.png -fft -ift lena_mp_roundtrip.png
else
#first download
wget http://optipng.sourceforge.net/pngtech/img/lena.png
#then convert
convert lena.png -fft -ift lena_mp_roundtrip.png
fi


see here for further information on fft transforms with, and watch your world spin faster

Installing NCVIEW for Ubuntu

Recently I ran into problems installing NCVIEW, which is a tool for efficiently viewing the contents of a NetCDF data file. The problem was something to do with the X terminal. So here's how to install it from source:

 wget ftp://cirrus.ucsd.edu/pub/ncview/ncview-1.93g.tar.gz  
sudo apt-get install libxaw7-dev
tar -xvvf ncview-1.93g.tar.gz
cd ncview-1.93g/
./configure --x-libraries=/usr/X11R6/lib
make
make install