Thursday, 6 December 2012

Create Custom Launchers in Fedora

I just finished installed SmartGit on my new OS, like I did the last one

SmartGit is a simple bash script that I had to run from the command line. This time I decided I wanted a program launcher from my applications menu and my 'favourites bar' (or whatever that thing on the left hand side of the desktop is called!) 

So first I moved the smartgit folder from ~/Downloads/ to /usr/local/ and made the .sh script executable

sudo cp -R ~/Downloads/smartgit-3_0_11/ /usr/local/
chmod +x /usr/local/smartgit-3_0_11/bin/smartgit.sh
view raw clf1.sh hosted with ❤ by GitHub


Then to create a launcher I made a new .desktop file:


sudo touch /usr/local/share/applications/smartgit.desktop
view raw clf2.sh hosted with ❤ by GitHub


and added the following:

Encoding=UTF-8
Version=1.0
Type=Application
Exec=/usr/local/smartgit-3_0_11/bin/smartgit.sh
Name=SMARTGIT
Comment=custom launcher for smartgit.sh
NoDisplay=false
Categories=Application;Programming;Utility;
Icon=/usr/local/smartgit-3_0_11/bin/smartgit-128.png
[Desktop Entry]
view raw clf3.sh hosted with ❤ by GitHub


Of course the 'Icon' can be anything you like - I chose the one which comes with the program out of sheer non-inventivenessIn Applications it will appear under All and Accessories. Right click and 'Add to Favourites' and it will appear on your side bar.

Friday, 30 November 2012

Create a diary for your daily workflow

You can modify your ~./bash_history file so it doens't store duplicates and stores more lines than the default (only 1000):

export HISTCONTROL=erasedumps
export HISTSIZE=100000
shopt -s histappend
view raw diary1.sh hosted with ❤ by GitHub


However, sometimes you want to go back to your history file and see what commands you issued on a particular day .... one solution is to make a periodic backup with a timestamp using cron.

First, make a directory to put your files in, and make a script which is going to do the work:

cd
touch backup_history.sh
mkdir history
view raw diary2.sh hosted with ❤ by GitHub


Open the shell script and copy the following inside

nano backup_history.sh
DATE=$(date +"%Y%m%d%H%M")
cp ~/.bash_history ~/history/$DATE.log
view raw diary3.sh hosted with ❤ by GitHub


close, then in the terminal issue

sudo nano /etc/crontab
#and copy the following
@hourly ~/./backup_history.sh
view raw cron.sh hosted with ❤ by GitHub

admittedly hourly is a little excessive - go here is you are unfamiliar with cron scheduling definitions and modify as you see fit

Wednesday, 28 November 2012

Installing Mb-System on Fedora 17

MB-System is the only fully open-source software I am aware of for swath sonar data including multibeam and sidescan backscatter. As such, I'm really hoping using it works out for me!

Compiling it on a fresh install of Fedora 17 wasn't that straight-forward (took me about 5 hours to figure all this out), so I thought I'd put together a little how-to for the benefit of myself, and hopefully you.

I've broken it down into a few stages so some sort of semblance of order can be imposed on this random collection of installation notes.
Step 1: download the software from ftp server here

In the terminal:

cd ~/Downloads
tar xvzf MB-System.tar.gz
view raw mb1.sh hosted with ❤ by GitHub

For me this created a folder called 'mbsystem-5.3.1982'

Step 2: install pre-requisites

A) Generic Mapping Tools (GMT). You need to go to the Downloads tab, then click on the INSTALL FORM link. This will take you to a page where you can download the installation script, and fill in an online form of your parameter settings which you can submit and save the resulting page as a textfile which becomes the input to the bash script. Sounds confusing, but it's not - the instructions on the page are adequate. I opted to allow GMT to install netCDF for me. Then in the terminal I did this:

sudo mkdir /usr/local/GMT
sudo sh install_gmt.sh GMT[45]param.txt
export NETCDFHOME=/home/me/Downloads/netcdf-3.6.3
export PATH=/usr/local/GMT/bin:$PATH
view raw mb2.sh hosted with ❤ by GitHub


sudo yum install perl-Parallel-ForkManager.noarch
view raw mb3.sh hosted with ❤ by GitHub


C) X11

sudo yum groupinstall "X Software Development"
view raw mb4.sh hosted with ❤ by GitHub


sudo yum install openmotif-clients.x86_64 openmotif.x86_64 openmotif-demos.x86_64
view raw mb5.sh hosted with ❤ by GitHub


E) fftw

sudo yum install fftw.x86_64 fftw-devel.x86_64
view raw mb6.sh hosted with ❤ by GitHub


F) ghostview - I had to install this indirectly using kde3:

sudo yum install kdebase3.x86_64
view raw mb6b.sh hosted with ❤ by GitHub


(Note to Fedora - why oh why oh why are B, C, and F above not installed by default!?)

G)  OTPSnc tidal prediction software: download from here
untar, and cd to the directory

first double check that ncdump and ncgen are installed (which ncdump ncgen)

then edit the makefile so it reads:

FC = gfortran
NCLIB = /usr/lib64
NCINCLUDE = /usr/include
NCLIBS= -lnetcdf -lnetcdff
view raw mb7.sh hosted with ❤ by GitHub

then in the terminal issue:

make extract_HC
make extract_predict_tide
view raw mb8.sh hosted with ❤ by GitHub

Hopefully this compiles without errors, then I moved them to a executable directory:

sudo mv extract_HC /usr/bin/
sudo mv predict_tide /usr/bin/
view raw mb9.sh hosted with ❤ by GitHub

H) openGL libraries (again I had to do this indirectly, this time through mesa):

sudo yum install mesa*
view raw mb10.sh hosted with ❤ by GitHub

Step 3: prepare mbsystem makefiles

cd mbsystem-5.3.1982/

You have to go in and point install_makefiles to where all your libraries are. This is time-consuming and involves a lot of ls, which, and whereis!
Here's a copy of the lines I edited in my install_makefiles parameters:

$MBSYSTEM_HOME = "/home/me/Downloads/mbsystem-5.3.1982";
$OS = "LINUX";
$CFLAGS = "-Wall -g -I/usr/include/X11";
$LFLAGS = "-Wall -lm -bind_at_load -Wl,-dylib_file,/usr/lib64/libGL.so";
$NETCDFLIBDIR = "/usr/local/lib";
$NETCDFINCDIR = "/usr/include";
$GMTLIBDIR = "/usr/local/GMT/lib";
$GMTINCDIR = "/usr/local/GMT/include";
$LEVITUS = "$MBSYSTEM_HOME/share/annual";
$PROJECTIONS = "$MBSYSTEM_HOME/share/Projections.dat";
$FFTWLIBDIR = "/usr/lib64";
$FFTWINCDIR = "/usr/include";
$MOTIFINCDIR = "/usr/include/openmotif/";
$MOTIFLIBS = "-L/usr/lib64/openmotif -L/usr/lib64/X11 -lXm -lXt -lX11";
$LEVITUS = "$MBSYSTEM_HOME/share/annual";
$OTPSDIR = "/usr/bin";
$CC = "gcc";
view raw mb12.sh hosted with ❤ by GitHub

Then in the terminal

Step 3: install mbsystem
first I had to do this (but you may not need to)
sudo cp /usr/lib64/libfftw3.so /usr/lib64/libfftw3.a
#then
make all
#assuming all worked ... I copied the man and bin files into somewhere more logical/permanent:
sudo mkdir /usr/local/mbsystem
sudo mkdir /usr/local/mbsystem/bin
sudo cp ~/Downloads/mbsystem-5.3.1982/bin/* /usr/local/mbsystem/bin
sudo cp -R ~/Downloads/mbsystem-5.3.1982/man/ /usr/local/mbsystem/
view raw mb14.sh hosted with ❤ by GitHub

I then updated my ~/.bashrc so the computer can find all these lovely new files:

MANPATH=$MANPATH:/usr/local/GMT/man:/usr/local/mbsystem/man
export MANPATH
PATH=$PATH:/usr/local/GMT/bin:/usr/local/mbsystem/bin
export PATH
view raw mb15.sh hosted with ❤ by GitHub


Test the install by issuing

man gmt
man mbfilter
view raw mb16.sh hosted with ❤ by GitHub


you should see the manual pages come up. Right, now down to the business of multibeam analysis!
Tuesday, 27 November 2012

em1 to ethX on Fedora 17 (how to install matlab if you don't have eth)


I have just moved from Ubuntu 12.04 to Fedora 17. No reason other than necessity for my new job. I'm still happy with Ubuntu and even don't mind Unity!

First thing I wanted to do, of course, was install matlab. It turns out I had a bit of work to do to get it installed on my Dell Precision machine! So here's a post to help out anyone who has the same problem.

If you don't have some eth listed when you ifconfig (I had the NIC listed as em1), matlab will install but you can't activate it. The problem is described on their website  

Basically, Fedora udev names NICs (network cards) embedded on the motherboard as em1, em2 (etc) rather then eth0, eth1 (etc). More details here

The two solutions listed on the Mathworks for changing the names back to eth do not work in my Fedora install. The reason why the first one doesn't work is because there is no /etc/iftab file. the reason why the second one works is because udev rules are not listed in etc (they are in lib instead and have different names and structures)
Thankfully, Fedora has built in a mechanism to modify the names of NICs post install. You do it by editing the following file

/lib/udev/rules.d/71-biosdevname.rules

so the line which reads

GOTO="netdevicename_end"

commented by default, is uncommented

Then you need to edit
/etc/default/grub

by adding the following line to the bottom:

biosdevname=0

Then I backed up my ifcfg em1 network script by issuing

cp /etc/sysconfig/network-scripts/ifcfg-em1 /etc/sysconfig/network-scripts/ifcfg-em1.old

then I renamed it eth0 (the number can be anything, I believe, between 0 and 9, and matlab will figure it out when it activates):

mv /etc/sysconfig/network-scripts/ifcfg-em1 /etc/sysconfig/network-scripts/ifcfg-eth0

and edited ifcfg-eth0 so the line which read

DEVICE="em1"

to read:

DEVICE="eth0"

This is all the information the machine needs, when it boots up, to change the naming convention from em1 back over to eth0.

Upon reboot, ifconfig shows eth0 where em1 was before (dmesg | grep eth would also show the change), and matlab installs perfectly.

A satisfyingly geeky end to a Tuesday!


Saturday, 29 September 2012

Downloading Photobucket albums with Matlab and wget

Here's a script to take the pain out of downloading an album of photos from photobucket.

It uses matlab to search a particular url for photo links (actually it looks for the thumbnail links and modifies the string to give you the full res photo link), then uses a system command call to wget to download the photos All in 8 lines of code! 

Ok to start you need the full url for your album. The '?start=all' bit at the end is important because this will show you all the thumbnails on a single page. Then simply use regexp to find the instances of thumbnail urls. Then loop through each link, strip the unimportant bits out, remove the 'th_' from the string which indicates the thumbnail version of the photo you want, and call wget to download the photo. Easy-peasy!

s = urlread('http://s1270.photobucket.com/albums/SERVERNAME/YOURUSERNAME/YOURALBUMNAME/?start=all');
indices = regexp(s,'pbthumburl=');
for k=1:length(indices)
tmp=strtrim(s(indices(k):indices(k)+100));
tmp=tmp(regexp(tmp,'"','once')+1:end);
tmp=tmp(1:regexp(tmp,'"','once')-1);
system(['wget ',tmp(1:regexp(tmp,'th_')-1),tmp(regexp(tmp,'th_')+3:end)]);
end
view raw photobucket.m hosted with ❤ by GitHub

Saturday, 15 September 2012

Alternative to bwconvhull

Matlab's bwconvhull is a fantastic new addition to the image processing library. It is a function which, in its full capacity, will return either the convex hull of the entire suite of objects in a binary image, or alternatively the convex hull of each individual object. I use it, in the latter capacity, for filling multiple large holes (holes large enough that imfill has no effect) in binary images containing segmented objects 

For those who do not have a newer Matlab version with bwconvhull included, I have written this short function designed to be an alternative to the usage

 P= bwconvhull(BW,'objects');

and here it is:

function P = bwconvhull_alt(BW)
% usage: P is a binary image wherein the convex hull of objects are returned, BW is the input binary image
% P= bwconvhull_alt(BW);
warning off all
s=regionprops(logical(BW),'ConvexImage','BoundingBox');
P=zeros(size(BW));
for no=1:length(s)
P(s(no).BoundingBox(2):s(no).BoundingBox(2)+s(no).BoundingBox(4)-1,...
s(no).BoundingBox:s(no).BoundingBox(1)+s(no).BoundingBox(3)-1)=s(no).ConvexImage;
end
warning on all


It uses the IP toolbox function regionprops, around for some time, to find the convex hull images of objects present, then inscribes them onto the output image using the bounding box coordinates. Simples!

Sunday, 9 September 2012

Craigslist Part 2: using matlab to plot your search results in Google Maps

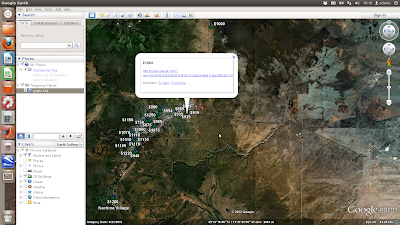
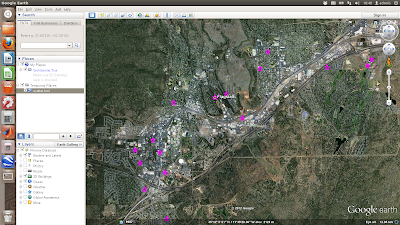
In 'Craigslist Part 1' I demonstrated a way to use matlab to automatically search craigslist for properties with certain attributes. In this post I show how to use matlab and python to create a kml file for plotting the results in Google Earth. Download the matlab googleearth toolbox from here Add google earth toolbox to path. Import search results data and get map links (location strings). Loop through each map location and string the address from the url, then geocode to obtain coordinates.
addpath(genpath('~/googleearth'))
dat=importdata('myFile.csv');
maps=dat.textdata(:,2);
prices=dat.data;
for i=1:size(maps,1)
address=char(maps(i,:));
address=address(regexp(address,'loc')+3:end);
% strip address of unnneccessary stuff
tmp = strrep(address, '%', ' ');
tmp = strrep(tmp, '+', ' ');
tmp(isstrprop(tmp, 'digit'))=[];
space=isspace(tmp);
letters=find(isletter(tmp)==1);
letters = letters(floor(gradient(letters))==1);
space(letters)=1;
% trim single letters but preserve location of spaces to make address
% readable
clean_address=strtrim(tmp(space));
% geocode address to lat,long coordinate. Geocode generates and runs a
% python script to do the conversion
[g1,g2] = geocode(clean_address);
% if any empty or unconverted addresses, call them nans
if isempty(g1)
g1=NaN; g2=NaN;
end
lat(i)=g1; lon(i)=g2;
end
view raw craig2.m hosted with ❤ by GitHub
The function 'geocode' writes and executes a python script to geocode the addresses (turn the address strings into longitude and latitude coordinates). The python module may be downloaded here
function [lat,lon] = geocode(address)
fid=fopen('test.py','wt');
fprintf(fid,'%s\n','from pygeocoder import Geocoder');
fprintf(fid,'%s\n',['results = Geocoder.geocode(''',deblank(address),''')']);
fprintf(fid,'%s\n','print results[0].coordinates');
fclose(fid);
[stat1,stat2]=system('python test.py');
stat2=deblank(stat2);
stat2=stat2(2:end-1);
lon=str2num(deblank(stat2(regexp(stat2,',')+1:end)));
lat=str2num(deblank(stat2(1:regexp(stat2,',')-1)));
view raw geocode.m hosted with ❤ by GitHub
Once we have the coordinates, we then need to get rid of nans and outliers (badly converted coordinates due to unreadable address strings). Use the google earth toolbox to build the kml file. Finally, run google earth and open the kml file using a system command:
f=isnan(lat);
lat(f)=[];
lon(f)=[];
maps(f)=[];
prices(f)=[];
f=find(lat>(mean(lat)+2*std(lat)));
lat(f)=[]; lon(f)=[]; maps(f)=[]; prices(f)=[];
f=find(lat<(mean(lat)-2*std(lat)));
lat(f)=[]; lon(f)=[]; maps(f)=[]; prices(f)=[];
f=find(lon>(mean(lon)+2*std(lon)));
lat(f)=[]; lon(f)=[]; maps(f)=[]; prices(f)=[];
f=find(lon<(mean(lon)-2*std(lon)));
lat(f)=[]; lon(f)=[]; maps(f)=[]; prices(f)=[];
kmlStr = ge_scatter(lon(:),lat(:),...
'marker','*',...
'markerEdgeColor','FFFF00FF',...
'markerFaceColor','80FF00FF',...
'markerScale',1e-3);
ge_output('scatter.kml',[kmlStr])
system(['google-earth "',pwd,filesep,'scatter.kml" &'])
view raw craig2b.m hosted with ❤ by GitHub
The above is a simple scatter plot which only shows the location of the properties and not any information about them. Next shows a more complicated example where the points are plotted with labels (the asking price) and text details (the google map links) in pop-up boxes First each coordinate pair is packaged with the map and name tags. Concatenate the strings for each coordinate and make a kml file. Finally, run google earth and open the kml file using a system command:
iconStr = 'http://maps.google.com/mapfiles/kml/pal2/icon10.png';
kmlStr=cell(1,length(maps));
for i=1:length(maps)
kmlStr{i} = ge_point_new(lon(i),lat(i),0,...
'iconURL',iconStr,...
'iconColor','FF0080FF',...
'description',maps{i},...
'name',['$',num2str(prices(i))]);
end
tmp=[];
for i=1:length(maps)
tmp=[tmp,eval(['kmlStr{',num2str(i),'}'])];
end
ge_output('points.kml',...
ge_folder('points',tmp));
system(['google-earth "',pwd,filesep,'points.kml" &'])
view raw craig2c.m hosted with ❤ by GitHub

Saturday, 8 September 2012

Broadcom wireless on Ubuntu 12.04

I just upgraded to Ubuntu 12.04 and my broadcom wireless card was not being picked up. It took me some time to figure out how to do this, and the forums give a lot of tips which didn't work for me, so I thought I'd give it a quick mention.

#In the terminal type
sudo rfkill unblock all
#then if you type
rfkill list all
#It should show something like:
1: brcmwl-0: Wireless LAN
    Soft blocked: no
    Hard blocked: no
#then type
echo "blacklist hp-wmi" | sudo tee -a /etc/modprobe.d/blacklist.conf
view raw broadcom.sh hosted with ❤ by GitHub


Then disconnect your wired connection and reboot. I found it is crucial that you disconnect any wired connections.

 Upon reboot, go to System Settings - Hardware - Additional Drivers

 It should then pick up the broadcom proprietary driver. Install it, then reboot, and you should be back up and running!

Friday, 7 September 2012

Craigslist Part 1: Using matlab to search according to your criteria and retrieve posting urls

I have a certain fondness for using matlab for obtaining data from websites. It simply involves understanding the way in which urls are constructed and a healthy does of regexp. In this example, I've written a matlab script to search craiglist for rental properties in Flagstaff with the following criteria: 1) 2 bedrooms 2) has pictures 3) within the price range 500 to 1250 dollars a month 4) allows pets 5) are not part of a 'community' housing development. This script will get their urls, prices, and google maps links, and write the results to a csv file. First, get the url and find indices of the hyperlinks only, then get only the indices of urls which are properties. Then get only the indices of urls which have a price in the advert description; find the prices; strip the advert urls from the string; sort the prices lowest to highest; and get rid of urls which mention a community housing development. Finally, get the links to google maps in the adverts if there are some, and write the filtered urls, maps, and prices to csv file.
s = urlread('http://flagstaff.craigslist.org/search/apa?query=&srchType=T&minAsk=500&maxAsk=1250&bedrooms=2&addThree=wooof&hasPic=1');
% find the hyperlinks
ind=regexp(s,'href');
useind=[];
for k=1:length(ind)
if ~isempty(regexp(s(ind(k):ind(k)+100),'apa', 'once'))
useind=[useind;k];
end
end
use=[];
for k=1:length(useind)
if ~isempty(regexp(s(ind(useind(k)):ind(useind(k))+200),'\$', 'once'))
use=[use;ind(useind(k))];
end
end
prices=cell(1,length(use));
for k=1:length(use)
prices{k}=str2double(s(use(k)+regexp(s(use(k):use(k)+200),'\$'):...
use(k)+regexp(s(use(k):use(k)+200),'\$')+3));
end
prices=cell2mat(prices);
urls=cell(1,length(use));
for k=1:length(use)
urls{k}=s(use(k)+regexp(s(use(k):use(k)+200),'http')-1:...
use(k)+regexp(s(use(k):use(k)+200),'.html')+3);
end
urls=char(urls');
[a,b]=sort(prices);
urls_sortprice=urls(b,:);
filter_out_community=[];
for k=1:length(use)
tmp=urlread(urls_sortprice(k,:));
if ~isempty(regexpi(tmp,'community '))
filter_out_community=[filter_out_community;k];
end
end
urls_sortprice_no_community=urls_sortprice;
urls_sortprice_no_community(filter_out_community,:)=[];
prices_no_community=a;
prices_no_community(filter_out_community)=[];
maps=cell(1,size(urls_sortprice_no_community,1));
for k=1:size(urls_sortprice_no_community,1)
tmp=urlread(urls_sortprice_no_community(k,:));
maps{k}=tmp(regexp(tmp,'http://maps.google'):regexp(tmp,'">google map')-1);
end
fid=fopen('myFile.csv','wt');
for i=1:length(maps)
fprintf(fid,'%s\n',[urls_sortprice_no_community(i,:),', ',maps{i},', ',...
num2str(prices_no_community(i))]);
end
fclose(fid);
view raw craig1.m hosted with ❤ by GitHub
Save and execute in matlab, or perhaps add this line to your crontab for a daily update!

/usr/local/MATLAB/R2011b/bin/matlab -nodesktop -nosplash -r "craigslist_search;quit;"

Wednesday, 22 August 2012

Reduce file size/quality of pdf using ghostscript

gs -sDEVICE=pdfwrite -dCompatibilityLevel=1.4 -dPDFSETTINGS=/screen -dNOPAUSE -dQUIET -dBATCH -sOutputFile=output.pdf input.pdf
view raw reduce.sh hosted with ❤ by GitHub

Write and execute a Matlab script without opening Matlab

Here's an example of using cat to write your m-file and then execute from the command line. This particular example will just plot and print 10 random numbers.
filename=my_script.m;
cat > $filename << EOF
figure
plot(rand(1,10))
print -dtiff test.tif
close
EOF
chmod +x $filename
/usr/local/MATLAB/R2011b/bin/matlab -nodesktop -nosplash -r "my_script;quit;"
view raw writem.sh hosted with ❤ by GitHub

Wednesday, 15 February 2012

SmartGit on Ubuntu 10.04

SmartGit is a graphical user interface for managing and creating git repositories for software version control

First, uninstall any git you already have (or thought you had)
 sudo apt-get remove git  
Then, get the latest git
 sudo aptitude build-dep git-core  
 wget http://git-core.googlecode.com/files/git-1.7.9.1.tar.gz  
 tar xvzf git-1.7.9.1.tar.gz  
 cd git-1.7.9.1  
 ./configure  
 make  
 sudo make install  
 cd ..  
 rm -r git-1.7.9.1 git-1.7.9.1.tar.gz  
Next, you need Java Runtime Environment 7 which you can download from here

and then follow the installation instructions here

Download SmartGit from here, then
 tar xvzf smartgit-generic-2_1_7.tar.gz  
 cd smartgit-2_1_7  
 cd bin  
Then edit the smartgit shell script
 gedit smartgit.sh  
updating SMARTGIT_JAVA_HOME to where JRE is installed (e.g. /usr/lib/jvm/jrel1.7.0_03). Now you're ready to run
 ./smartgit.sh  
As part of the installation you will be prompted for the location of git, which you can find out by issuing in another terminal:
 whereis git