The following is an example of how to launch a program running in a terminal upon boot, in Raspbian wheezy:
and add:
This will allow the same program to be launched from the desktop upon double-click:
add
Friday, 8 February 2013

Monday, 4 February 2013
Compiling points2grid on Fedora with g++
Gridding large [x,y,z] point cloud datasets. Matlab and python have both failed me with their inefficient use of memory. So I'm having to turn to other tools.
Points2Grid is a tool, written in C++, which promises to do the job in a simple intuitive way. It accepts ascii and las (lidar) formats and outputs gridded data, plus gridded data densities.
First install LIBLAS which is Lidar data translation libraries. The recommended version is 1.2.1. I installed liblas 1.6.1 because it was the oldest version on the site that had a working link. I installed this by issuing:
Points2Grid is a tool, written in C++, which promises to do the job in a simple intuitive way. It accepts ascii and las (lidar) formats and outputs gridded data, plus gridded data densities.
First install LIBLAS which is Lidar data translation libraries. The recommended version is 1.2.1. I installed liblas 1.6.1 because it was the oldest version on the site that had a working link. I installed this by issuing:
Make a note of where the libraries are installed. On my system: /usr/local/include/liblas/
Download points2grid from here.
In Interpolation.h, adjust MEM_LIMIT variable in the file to reflect the memory limitations of your system. From the README guide,
"As a rule of thumb, set the MEM_LIMIT to be (available memory in bytes)/55. For jobs that generate
grids cells greater than the MEM_LIMIT, points2grid goes "out-of-core", resulting in significantly worse performance."
Find this value using:
I then had to point the code to where the liblas directories had been installed. In Interpolation.cpp, replace:
It should then install with a simple 'make' command. Happy gridding!
Saturday, 26 January 2013
Automatic Clustering of Geo-tagged Images. Part 2: Other Feature Metrics
In the last post I took a look at a simple method for trying to automatically cluster a set of images (of Horseshoe Bend, Glen Canyon, Arizona). Some of those picture were of the river (from different perspectives) and some of other things nearby.
With a goal of trying to separate the two classes, the results were reasonably satisfactory with image histograms as a feature metric, and a little user input. However, it'd be nice to get a more automated/objective way to separate the images into two discrete clusters. Perhaps the feature detection method requires a little more scrutiny?
In this post I look at 5 methods using the functionality of the excellent Mahotas toolbox for python downloaded here:
1) Image moments (I compute the first 5)
2) Haralick texture descriptors which are based on the co-occurrence matrix of the image
3) Zernike Moments
4) Threshold adjacency statistics (TAS)
5) Parameter-free threshold adjacency statistics (PFTAS)
The code is identical to the last post except for the feature extraction loop. What I'm looking for is as many images of the river at either low distances (extreme left in the dendrogram) or very high distances (extreme right in the dendrograms). These clusters have been highlighted below. There are 18 images of the river bend.
In order of success (low to high):
1) Zernike (using a radius of 50 pixels and 8 degrees, but other combinations tried):

This does a poor job, with no clusters at either end of the dendrogram.
2) Haralick:
 There is 1 cluster of 4 images at the start
3) Moments:

There is 1 cluster of 6 images at the start, and 1 cluster of 2 at the end
4) TAS:
 There is 1 cluster of 7 images at the start, and 1 cluster of 5 near the end, and both clusters are on the same stem
5) PFTAS:

The cluster at the end contains 16 out of 18 images of the river bend at the end. Plus there are no user-defined parameters. My kind of algorithm. The winner by far!
So there you have it, progress so far! No methods tested so far is perfect. There may or may not be a 'part 3' depending on my progress, or lack of!
With a goal of trying to separate the two classes, the results were reasonably satisfactory with image histograms as a feature metric, and a little user input. However, it'd be nice to get a more automated/objective way to separate the images into two discrete clusters. Perhaps the feature detection method requires a little more scrutiny?
In this post I look at 5 methods using the functionality of the excellent Mahotas toolbox for python downloaded here:
1) Image moments (I compute the first 5)
2) Haralick texture descriptors which are based on the co-occurrence matrix of the image
3) Zernike Moments
4) Threshold adjacency statistics (TAS)
5) Parameter-free threshold adjacency statistics (PFTAS)
The code is identical to the last post except for the feature extraction loop. What I'm looking for is as many images of the river at either low distances (extreme left in the dendrogram) or very high distances (extreme right in the dendrograms). These clusters have been highlighted below. There are 18 images of the river bend.
In order of success (low to high):
1) Zernike (using a radius of 50 pixels and 8 degrees, but other combinations tried):

2) Haralick:

3) Moments:

4) TAS:

5) PFTAS:

The cluster at the end contains 16 out of 18 images of the river bend at the end. Plus there are no user-defined parameters. My kind of algorithm. The winner by far!
So there you have it, progress so far! No methods tested so far is perfect. There may or may not be a 'part 3' depending on my progress, or lack of!
Tuesday, 22 January 2013
Automatic Clustering of Geo-tagged Images. Part 1: using multi-dimensional histograms
There's a lot of geo-tagged images on the web. Sometimes the image coordinate is slightly wrong, or the scene isn't quite what you expect. It's therefore useful to have a way to automatically download images from a given place (specified by a coordinate) from the web, and automatically classify them according to content/scene.
In this post I describe a pythonic way to:
1) automatically download images based on input coordinate (lat, long)
2) extract a set features from each image
3) classify each image into groups
4) display the results as a dendrogram
This first example, 2) is achieved using a very simple means, namely the image histogram of image values. This doesn't take into account any texture similarities or connected components, etc. Nonetheless, it does a reasonably good job at classifying the images into a number of connected groups, as we shall see.
In subsequent posts I'm going to play with different ways to cluster images based on similarity, so watch this space!
User inputs: give a lat and long of a location, a path where you want the geo-tagged photos, and the number of images to download
First, import the libraries you'll need. Then interrogates the website and downloads the images.
As you can see the resulting images are a mixed bag. There's images of the river bend, the road, the desert, Lake Powell and other random stuff. My task is to automatically classify these images so it's easier to pull out just the images of the river bend


The following compiles a list of these images. The last part is to sort which is not necessary but doing so converts the list into a numpy array which is. Then clustering of the images is achieved using Jan Erik Solem's rather wonderful book 'Programming Computer Vision with Python'. The examples from which can be downloaded here. Download this one, then this bit of code does the clustering:


In this post I describe a pythonic way to:
1) automatically download images based on input coordinate (lat, long)
2) extract a set features from each image
3) classify each image into groups
4) display the results as a dendrogram
This first example, 2) is achieved using a very simple means, namely the image histogram of image values. This doesn't take into account any texture similarities or connected components, etc. Nonetheless, it does a reasonably good job at classifying the images into a number of connected groups, as we shall see.
In subsequent posts I'm going to play with different ways to cluster images based on similarity, so watch this space!
User inputs: give a lat and long of a location, a path where you want the geo-tagged photos, and the number of images to download
First, import the libraries you'll need. Then interrogates the website and downloads the images.
As you can see the resulting images are a mixed bag. There's images of the river bend, the road, the desert, Lake Powell and other random stuff. My task is to automatically classify these images so it's easier to pull out just the images of the river bend


The following compiles a list of these images. The last part is to sort which is not necessary but doing so converts the list into a numpy array which is. Then clustering of the images is achieved using Jan Erik Solem's rather wonderful book 'Programming Computer Vision with Python'. The examples from which can be downloaded here. Download this one, then this bit of code does the clustering:
The approach taken is to use hierarchical clustering using a simple euclidean distance function. This bit of code does the dendogram plot of the images:
which in my case looks like this (click on the image to see the full extent):
It's a little small, but you can just about see (if you scroll to the right) that it does a good job at clustering images of the river bend which look similar. The single-clustered, or really un-clustered, images to the left are those of the rim, road, side walls, etc which don't look anything like the river bend.
Next, reorder the image list in terms of similarity distance (which increases in both the x and y directions of the dendrogram above)
Which gives me:
As you can see they are all images of the river bend, except the 2nd from the left on the top row, which is a picture of a shrub. Interestingly, the pattern of a circular shrub surrounded by a strip of sand is visually similar to the horse shoe bend!!
However, we don't want to include it with images of the river, which is why a more sophisticated method that image histogram is required to classify and group similar image ... the subject of a later post.
Sunday, 20 January 2013
Alpha Shapes in Python
Alpha shapes include convex and concave hulls. Convex hull algorithms are ten a penny, so what we're really interested in here in the concave hull of an irregularly or otherwise non-convex shaped 2d point cloud, which by all accounts is more difficult.
The function is here:
The above is essentially the same wrapper as posted here, except a different way of reading in the data, and providing the option to specify a probe radius. It uses Ken Clarkson's C-code, instructions on how to compile are here
An example implementation:
The above data generation is translated from the example in a matlab alpha shape function . Then:
Which produces (points are blue dots, alpha shape is red line):
 and on a larger data set (with radius=1, this is essentially the convex hull):
 and a true concave hull:

The function is here:
The above is essentially the same wrapper as posted here, except a different way of reading in the data, and providing the option to specify a probe radius. It uses Ken Clarkson's C-code, instructions on how to compile are here
An example implementation:
The above data generation is translated from the example in a matlab alpha shape function . Then:
Which produces (points are blue dots, alpha shape is red line):


Patchwork quilt in Python
Here's a fun python function to make a plot of [x,y] coordinate data as a patchwork quilt with user-defined 'complexity'. It initially segments the data into 'numsegs' number of clusters by a k-means algorithm. It then takes each segment and creates 'numclass' sub-clusters based on the euclidean distance from the centroid of the cluster. Finally, it plots each subcluster a different colour and prints the result as a png file.
inputs:
'data' is a Nx2 numpy array of [x,y] points
'numsegs' and 'numclass' are integer scalars. The greater these numbers the greater the 'complexity' of the output and the longer the processing time
Some example outputs in increasing complexity:
numsegs=10, numclass=5

numsegs=15, numclass=15

numsegs=20, numclass=50

inputs:
'data' is a Nx2 numpy array of [x,y] points
'numsegs' and 'numclass' are integer scalars. The greater these numbers the greater the 'complexity' of the output and the longer the processing time
Some example outputs in increasing complexity:
numsegs=10, numclass=5

numsegs=15, numclass=15

numsegs=20, numclass=50

Wednesday, 16 January 2013
Compiling Clarkson's Hull on Fedora
A note on compiling Ken Clarkson's hull program for efficiently computing convex and concave hulls (alpha shapes) of point clouds, on newer Fedora
First, follow the fix described here which fixes the pasting errors given if using gcc compiler.
Then, go into hullmain.c and replace the line which says:
at the end of the function declarations (before the first while loop)
Finally, rewrite the makefile so it reads as below It differs significantly from the one provided.
Notice how the CFLAGS have been removed. Compile as root (sudo make)
Thursday, 6 December 2012
Create Custom Launchers in Fedora
I just finished installed SmartGit on my new OS, like I did the last one
SmartGit is a simple bash script that I had to run from the command line. This time I decided I wanted a program launcher from my applications menu and my 'favourites bar' (or whatever that thing on the left hand side of the desktop is called!)
So first I moved the smartgit folder from ~/Downloads/ to /usr/local/ and made the .sh script executable
Then to create a launcher I made a new .desktop file:
and added the following:
SmartGit is a simple bash script that I had to run from the command line. This time I decided I wanted a program launcher from my applications menu and my 'favourites bar' (or whatever that thing on the left hand side of the desktop is called!)
So first I moved the smartgit folder from ~/Downloads/ to /usr/local/ and made the .sh script executable
Then to create a launcher I made a new .desktop file:
and added the following:
Of course the 'Icon' can be anything you like - I chose the one which comes with the program out of sheer non-inventiveness! In Applications it will appear under All and Accessories. Right click and 'Add to Favourites' and it will appear on your side bar.
Friday, 30 November 2012
Create a diary for your daily workflow
You can modify your ~./bash_history file so it doens't store duplicates and stores more lines than the default (only 1000):
However, sometimes you want to go back to your history file and see what commands you issued on a particular day .... one solution is to make a periodic backup with a timestamp using cron.
First, make a directory to put your files in, and make a script which is going to do the work:
Open the shell script and copy the following inside
close, then in the terminal issue
admittedly hourly is a little excessive - go here is you are unfamiliar with cron scheduling definitions and modify as you see fit
However, sometimes you want to go back to your history file and see what commands you issued on a particular day .... one solution is to make a periodic backup with a timestamp using cron.
First, make a directory to put your files in, and make a script which is going to do the work:
Open the shell script and copy the following inside
close, then in the terminal issue
admittedly hourly is a little excessive - go here is you are unfamiliar with cron scheduling definitions and modify as you see fit
Wednesday, 28 November 2012
Installing Mb-System on Fedora 17
MB-System is the only fully open-source software I am aware of for swath sonar data including multibeam and sidescan backscatter. As such, I'm really hoping using it works out for me!
Compiling it on a fresh install of Fedora 17 wasn't that straight-forward (took me about 5 hours to figure all this out), so I thought I'd put together a little how-to for the benefit of myself, and hopefully you.
Test the install by issuing
you should see the manual pages come up. Right, now down to the business of multibeam analysis!
Compiling it on a fresh install of Fedora 17 wasn't that straight-forward (took me about 5 hours to figure all this out), so I thought I'd put together a little how-to for the benefit of myself, and hopefully you.
I've broken it down into a few stages so some sort of semblance of order can be imposed on this random collection of installation notes.
Step 1: download the software from ftp server here
In the terminal:
For me this created a folder called 'mbsystem-5.3.1982'
Step 2: install pre-requisites
A) Generic Mapping Tools (GMT). You need to go to the Downloads tab, then click on the INSTALL FORM link. This will take you to a page where you can download the installation script, and fill in an online form of your parameter settings which you can submit and save the resulting page as a textfile which becomes the input to the bash script. Sounds confusing, but it's not - the instructions on the page are adequate. I opted to allow GMT to install netCDF for me. Then in the terminal I did this:
C) X11
D) openmotif
E) fftw
F) ghostview - I had to install this indirectly using kde3:
(Note to Fedora - why oh why oh why are B, C, and F above not installed by default!?)
G) OTPSnc tidal prediction software: download from here
untar, and cd to the directory
first double check that ncdump and ncgen are installed (which ncdump ncgen)
then edit the makefile so it reads:
then in the terminal issue:
Hopefully this compiles without errors, then I moved them to a executable directory:
Step 3: prepare mbsystem makefiles
cd mbsystem-5.3.1982/
You have to go in and point install_makefiles to where all your libraries are. This is time-consuming and involves a lot of ls, which, and whereis!
Here's a copy of the lines I edited in my install_makefiles parameters:
Then in the terminal
Step 3: install mbsystem
first I had to do this (but you may not need to)
I then updated my ~/.bashrc so the computer can find all these lovely new files:
Test the install by issuing
you should see the manual pages come up. Right, now down to the business of multibeam analysis!
Tuesday, 27 November 2012
em1 to ethX on Fedora 17 (how to install matlab if you don't have eth)
I have just moved from Ubuntu 12.04 to Fedora 17. No reason other than necessity for my new job. I'm still happy with Ubuntu and even don't mind Unity!
First thing I wanted to do, of course, was install matlab. It turns out I had a bit of work to do to get it installed on my Dell Precision machine! So here's a post to help out anyone who has the same problem.
If you don't have some eth listed when you ifconfig (I had the NIC listed as em1), matlab will install but you can't activate it. The problem is described on their website
Basically, Fedora udev names NICs (network cards) embedded on the motherboard as em1, em2 (etc) rather then eth0, eth1 (etc). More details here
The two solutions listed on the Mathworks for changing the names back to eth do not work in my Fedora install. The reason why the first one doesn't work is because there is no /etc/iftab file. the reason why the second one works is because udev rules are not listed in etc (they are in lib instead and have different names and structures)
Thankfully, Fedora has built in a mechanism to modify the names of NICs post install. You do it by editing the following file
/lib/udev/rules.d/71-biosdevname.rules
so the line which reads
GOTO="netdevicename_end"
commented by default, is uncommented
/etc/default/grub
by adding the following line to the bottom:
biosdevname=0
Then I backed up my ifcfg em1 network script by issuing
cp /etc/sysconfig/network-scripts/ifcfg-em1 /etc/sysconfig/network-scripts/ifcfg-em1.old
then I renamed it eth0 (the number can be anything, I believe, between 0 and 9, and matlab will figure it out when it activates):
mv /etc/sysconfig/network-scripts/ifcfg-em1 /etc/sysconfig/network-scripts/ifcfg-eth0
and edited ifcfg-eth0 so the line which read
DEVICE="em1"to read:
DEVICE="eth0"This is all the information the machine needs, when it boots up, to change the naming convention from em1 back over to eth0.
Upon reboot, ifconfig shows eth0 where em1 was before (dmesg | grep eth would also show the change), and matlab installs perfectly.
A satisfyingly geeky end to a Tuesday!
Saturday, 29 September 2012
Downloading Photobucket albums with Matlab and wget
Here's a script to take the pain out of downloading an album of photos from photobucket.
It uses matlab to search a particular url for photo links (actually it looks for the thumbnail links and modifies the string to give you the full res photo link), then uses a system command call to wget to download the photos All in 8 lines of code!
Ok to start you need the full url for your album. The '?start=all' bit at the end is important because this will show you all the thumbnails on a single page. Then simply use regexp to find the instances of thumbnail urls. Then loop through each link, strip the unimportant bits out, remove the 'th_' from the string which indicates the thumbnail version of the photo you want, and call wget to download the photo. Easy-peasy!
It uses matlab to search a particular url for photo links (actually it looks for the thumbnail links and modifies the string to give you the full res photo link), then uses a system command call to wget to download the photos All in 8 lines of code!
Ok to start you need the full url for your album. The '?start=all' bit at the end is important because this will show you all the thumbnails on a single page. Then simply use regexp to find the instances of thumbnail urls. Then loop through each link, strip the unimportant bits out, remove the 'th_' from the string which indicates the thumbnail version of the photo you want, and call wget to download the photo. Easy-peasy!
Saturday, 15 September 2012
Alternative to bwconvhull
Matlab's bwconvhull is a fantastic new addition to the image processing library. It is a function which, in its full capacity, will return either the convex hull of the entire suite of objects in a binary image, or alternatively the convex hull of each individual object.
I use it, in the latter capacity, for filling multiple large holes (holes large enough that imfill has no effect) in binary images containing segmented objects
For those who do not have a newer Matlab version with bwconvhull included, I have written this short function designed to be an alternative to the usage
and here it is:
It uses the IP toolbox function regionprops, around for some time, to find the convex hull images of objects present, then inscribes them onto the output image using the bounding box coordinates. Simples!
For those who do not have a newer Matlab version with bwconvhull included, I have written this short function designed to be an alternative to the usage
P= bwconvhull(BW,'objects');and here it is:
It uses the IP toolbox function regionprops, around for some time, to find the convex hull images of objects present, then inscribes them onto the output image using the bounding box coordinates. Simples!
Sunday, 9 September 2012
Craigslist Part 2: using matlab to plot your search results in Google Maps
In 'Craigslist Part 1' I demonstrated a way to use matlab to automatically search craigslist for properties with certain attributes. In this post I show how to use matlab and python to create a kml file for plotting the results in Google Earth.
Download the matlab googleearth toolbox from here
Add google earth toolbox to path. Import search results data and get map links (location strings). Loop through each map location and string the address from the url, then geocode to obtain coordinates.
The function 'geocode' writes and executes a python script to geocode the addresses (turn the address strings into longitude and latitude coordinates). The python module may be downloaded here
Once we have the coordinates, we then need to get rid of nans and outliers (badly converted coordinates due to unreadable address strings). Use the google earth toolbox to build the kml file. Finally, run google earth and open the kml file using a system command:
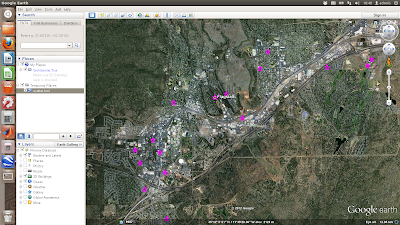 The above is a simple scatter plot which only shows the location of the properties and not any information about them. Next shows a more complicated example where the points are plotted with labels (the asking price) and text details (the google map links) in pop-up boxes
First each coordinate pair is packaged with the map and name tags. Concatenate the strings for each coordinate and make a kml file. Finally, run google earth and open the kml file using a system command:
The above is a simple scatter plot which only shows the location of the properties and not any information about them. Next shows a more complicated example where the points are plotted with labels (the asking price) and text details (the google map links) in pop-up boxes
First each coordinate pair is packaged with the map and name tags. Concatenate the strings for each coordinate and make a kml file. Finally, run google earth and open the kml file using a system command:
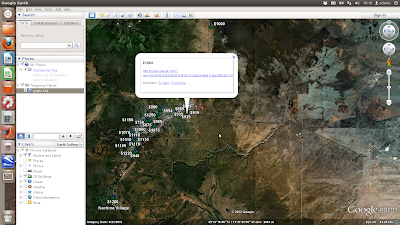
 The above is a simple scatter plot which only shows the location of the properties and not any information about them. Next shows a more complicated example where the points are plotted with labels (the asking price) and text details (the google map links) in pop-up boxes
First each coordinate pair is packaged with the map and name tags. Concatenate the strings for each coordinate and make a kml file. Finally, run google earth and open the kml file using a system command:
The above is a simple scatter plot which only shows the location of the properties and not any information about them. Next shows a more complicated example where the points are plotted with labels (the asking price) and text details (the google map links) in pop-up boxes
First each coordinate pair is packaged with the map and name tags. Concatenate the strings for each coordinate and make a kml file. Finally, run google earth and open the kml file using a system command:

Saturday, 8 September 2012
Broadcom wireless on Ubuntu 12.04
I just upgraded to Ubuntu 12.04 and my broadcom wireless card was not being picked up. It took me some time to figure out how to do this, and the forums give a lot of tips which didn't work for me, so I thought I'd give it a quick mention.
Then disconnect your wired connection and reboot. I found it is crucial that you disconnect any wired connections.
Upon reboot, go to System Settings - Hardware - Additional Drivers
It should then pick up the broadcom proprietary driver. Install it, then reboot, and you should be back up and running!
Then disconnect your wired connection and reboot. I found it is crucial that you disconnect any wired connections.
Upon reboot, go to System Settings - Hardware - Additional Drivers
It should then pick up the broadcom proprietary driver. Install it, then reboot, and you should be back up and running!
Friday, 7 September 2012
Craigslist Part 1: Using matlab to search according to your criteria and retrieve posting urls
I have a certain fondness for using matlab for obtaining data from websites. It simply involves understanding the way in which urls are constructed and a healthy does of regexp. In this example, I've written a matlab script to search craiglist for rental properties in Flagstaff with the following criteria:
1) 2 bedrooms
2) has pictures
3) within the price range 500 to 1250 dollars a month
4) allows pets
5) are not part of a 'community' housing development.
This script will get their urls, prices, and google maps links, and write the results to a csv file.
First, get the url and find indices of the hyperlinks only, then get only the indices of urls which are properties. Then get only the indices of urls which have a price in the advert description; find the prices; strip the advert urls from the string; sort the prices lowest to highest; and get rid of urls which mention a community housing development.
Finally, get the links to google maps in the adverts if there are some, and write the filtered urls, maps, and prices to csv file.
Save and execute in matlab, or perhaps add this line to your crontab for a daily update!
/usr/local/MATLAB/R2011b/bin/matlab -nodesktop -nosplash -r "craigslist_search;quit;"
Wednesday, 22 August 2012
Write and execute a Matlab script without opening Matlab
Here's an example of using cat to write your m-file and then execute from the command line. This particular example will just plot and print 10 random numbers.
Wednesday, 15 February 2012
SmartGit on Ubuntu 10.04
SmartGit is a graphical user interface for managing and creating git repositories for software version control
First, uninstall any git you already have (or thought you had)
and then follow the installation instructions here
Download SmartGit from here, then
First, uninstall any git you already have (or thought you had)
sudo apt-get remove git
 sudo aptitude build-dep git-core
 wget http://git-core.googlecode.com/files/git-1.7.9.1.tar.gz
 tar xvzf git-1.7.9.1.tar.gz
 cd git-1.7.9.1
 ./configure
 make
 sudo make install
 cd ..
 rm -r git-1.7.9.1 git-1.7.9.1.tar.gz
and then follow the installation instructions here
Download SmartGit from here, then
 tar xvzf smartgit-generic-2_1_7.tar.gz
 cd smartgit-2_1_7
 cd bin
gedit smartgit.sh
./smartgit.sh
whereis git
Saturday, 10 September 2011
Ellipse Fitting to 2D points, part 3: Matlab
The last of 3 posts presenting algorithms for the ellipsoid method of Khachiyan for 2D point clouds. This version in Matlab will return: 1) the ellipse radius in x, 2) the ellipse radius in y, 3) the centre in x, 4) the centre in y, and 5) orientation of the ellipse, and coordinates of the ellipse
Ellipse Fitting to 2D points, part 2: Python
The second of 3 posts presenting algorithms for the ellipsoid method of Khachiyan for 2D point clouds. This version in python will return: 1) the ellipse radius in x, 2) the ellipse radius in y
x is a 2xN array [x,y] points
Ellipse Fitting to 2D points, part 1: R
The first of 3 posts presenting algorithms for the ellipsoid method of Khachiyan for 2D point clouds. This version in R will return: 1) the ellipse radius in x, 2) the ellipse radius in y, 3) the centre in x, 4) the centre in y, and 5) orientation of the ellipse, and coordinates of the ellipse
Non-linear least squares fit forced through a point
Sometimes you want a least-squares polynomial fit to data but to constrain it so it passes through a certain point. Well ...
Inputs: x, y (data); x0 and y0 are the coordinates of the point you want it to pass through, and n is the degree of polynomial
Matlab function to generate a homogeneous 3-D Poisson spatial distribution
This is based on Computational Statistics Toolbox by W. L. and A. R. Martinez, which has a similar algorithm in 2D. It uses John d'Errico's inhull function
Inputs: N = number of data points which you want to be uniformly distributed over XP, YP, ZP which represent the vertices of the region in 3 dimensions
Outputs: x,y,z are the coordinates of generated points
3D spectral noise in Matlab with specified autocorrelation
Here is a function to generate a 3D matrix of 1/frequency noise
Inputs are 1)rows, 2) cols (self explanatory I hope), 3) dep (the 3rd dimension - number of images in the stack) and 4) factor, which is the degree of autocorrelation in the result. The larger this value, the more autocorrelation an the bigger the 'blobs' in 3D
Enjoy!
Computational geometry with Matlab and MPT
For computational geometry problems there is a rather splendid tool called the Multi Parametric Toolbox for Matlab
Here are a few examples of using this toolbox for a variety of purposes using 3D convex polyhedra represented as polytope arrays. In the following examples, P is always a domain bounded 3D polytope array
Sunday, 12 June 2011
Restoring Nvidia graphics on Ubuntu
If you're an idiot like me and do this:
sudo apt-get --purge remove nvidia-*
You'll soon realise your display looks a little crappy, because you've turned off your graphics card drivers. Not to worry! You restore like this:
sudp apt-get install nvidia-*
then go into /etc/modprobe.d/blacklist.conf and remove any 'blacklists' to nvidia drivers, then restart the x-server using
sudo /etc/init.d/gdm restart
Normal service resumed, and you are free to make a new balls-up!
sudo apt-get --purge remove nvidia-*
You'll soon realise your display looks a little crappy, because you've turned off your graphics card drivers. Not to worry! You restore like this:
sudp apt-get install nvidia-*
then go into /etc/modprobe.d/blacklist.conf and remove any 'blacklists' to nvidia drivers, then restart the x-server using
sudo /etc/init.d/gdm restart
Normal service resumed, and you are free to make a new balls-up!
Sunday, 27 March 2011
Wrapping and interfacing compiled code into more flexible and user-friendly programs using Zenity and Bash
Subtitles include:
1. How to reconstruct the three-dimensional shape of an object in a scene in a very inexpensive way using shadow-casting
2. How to write and execute a matlab script from a bash script
I've written a bash script - shadowscan.sh - which is a wrapper for a set of programs for the reconstruction 3D surface of an object in a series of photographs using the ingenious shadow-casting algorithm of Jean-Yves Bouguet and Pietro Perona
The script relies heavily on the GUI-style interfacing tools of Zenity and acts as an interface and wrapper for the algorithm as implemented by these guys. It will also write and execute a matlab script for visualising the outputs.
This script should live in a directory with the following compiled programs, all available here:
1. ccalib (performs the camera calibration to retrieve the intrinsic parameters of camera and desk)
2. find_light (performs the light calibration to find light-source coordinates)
3. desk_scan (does the 3d reconstruction)
4. merge (merges 2 3d reconstructions, e.g. from different angles)
and the following matlab script:
1. selectdata.m (available here)
When the makefile is run, it creates the compiled programs in the ./bin directory. It's important to consult the README in the main folder as well as within the 'desk_scan' folder to have a clear idea of what the program does and what the input parameters mean.
My program will check if the camera calibration and light calibration files exist in the folder and if not will carry them out accordingly then several reconstructions are carried out, and the outputs merged. Finally matlab is called from the command line to run 'p_lightscan_data.m' to visualize the results.
when the script finishes there will be the following output files:
1. xdim.txt - max dimension to scan to
2. params - camera calibration parameters
3. data - camera calibration data
4. light.txt - light calibration parameters
5. sample.pts - [x,y,z] of object, in coordinates relative to light source
6. sample_lightscan1.tif - filled colour contour plot of reconstructed object
7. sample_lightscan2.tif - mesh plot of reconstructed object
I've tried to keep it flexible. It will run only the elements it needs to. For example, if the camera or lighting has been carried out before for a different object it will pick up on that. Also, the program can be invoked by passing it two arguments (path to folder where sample images are, and what sequence of contrasts to use for the reconstruction), which avoids having to input with the graphical menus. Example usage:
1. bash shadowscan.sh
2. bash shadowscan.sh /home/daniel/Desktop/shadow_scanning/sample/bottle 30.35.40.45
1. How to reconstruct the three-dimensional shape of an object in a scene in a very inexpensive way using shadow-casting
2. How to write and execute a matlab script from a bash script
I've written a bash script - shadowscan.sh - which is a wrapper for a set of programs for the reconstruction 3D surface of an object in a series of photographs using the ingenious shadow-casting algorithm of Jean-Yves Bouguet and Pietro Perona
The script relies heavily on the GUI-style interfacing tools of Zenity and acts as an interface and wrapper for the algorithm as implemented by these guys. It will also write and execute a matlab script for visualising the outputs.
This script should live in a directory with the following compiled programs, all available here:
1. ccalib (performs the camera calibration to retrieve the intrinsic parameters of camera and desk)
2. find_light (performs the light calibration to find light-source coordinates)
3. desk_scan (does the 3d reconstruction)
4. merge (merges 2 3d reconstructions, e.g. from different angles)
and the following matlab script:
1. selectdata.m (available here)
When the makefile is run, it creates the compiled programs in the ./bin directory. It's important to consult the README in the main folder as well as within the 'desk_scan' folder to have a clear idea of what the program does and what the input parameters mean.
My program will check if the camera calibration and light calibration files exist in the folder and if not will carry them out accordingly then several reconstructions are carried out, and the outputs merged. Finally matlab is called from the command line to run 'p_lightscan_data.m' to visualize the results.
when the script finishes there will be the following output files:
1. xdim.txt - max dimension to scan to
2. params - camera calibration parameters
3. data - camera calibration data
4. light.txt - light calibration parameters
5. sample.pts - [x,y,z] of object, in coordinates relative to light source
6. sample_lightscan1.tif - filled colour contour plot of reconstructed object
7. sample_lightscan2.tif - mesh plot of reconstructed object
I've tried to keep it flexible. It will run only the elements it needs to. For example, if the camera or lighting has been carried out before for a different object it will pick up on that. Also, the program can be invoked by passing it two arguments (path to folder where sample images are, and what sequence of contrasts to use for the reconstruction), which avoids having to input with the graphical menus. Example usage:
1. bash shadowscan.sh
2. bash shadowscan.sh /home/daniel/Desktop/shadow_scanning/sample/bottle 30.35.40.45
Saturday, 26 March 2011
Program for spatial correlogram of an image, in C
This program will read an image, convert it to greyscale, crop it to a square, and calculate it's spatial (1D) autocorrelation function (correlogram), printing it to screen.
It uses OpenCV image processing libraries - see here and here
Compilation instructions (in Ubuntu):
Usage in the terminal:
The program:
It uses OpenCV image processing libraries - see here and here
Compilation instructions (in Ubuntu):
 sudo apt-get install libcv-dev libcv1 libcvaux-dev libcvaux1 libhighgui-dev libhighgui1
 pkg-config --libs opencv; pkg-config --cflags opencv
 PKG_CONFIG_PATH=/usr/lib/pkgconfig/:${PKG_CONFIG_PATH}
 export PKG_CONFIG_PATH
 gcc `pkg-config --cflags --libs opencv` -o Rspat Rspat.c
Usage in the terminal:
./Rspat IMG_0208.JPG
The program:
Controlling a serial device with Python
This program to sends a command to serial device, receives data from the device, converts it to numeric format, and graphs the data in real time. It is written in Python using wxPython for the display.
The device is connected to /dev/ttyS0 with a baud rate of 19200, 8-bit data, no parity, and 1 stopbit. You need to edit the line 'serial.Serial' with the relevant parameters to use this code for your device. Editing 'DATA_LENGTH' will change the rate at which the graph scrolls forward. Also, you'd need to change the 'command' that the device understands as 'send me data' (here it is the s character - line 'input'). Knowledge of the format of the returned data is also essential (here I turn ascii into 2 integers) line 'struct.unpack' - see here for help). Otherwise this should work with any device. Tested on Ubuntu 9.10 and 10.4 using serial port and USB-serial converters.
The device is connected to /dev/ttyS0 with a baud rate of 19200, 8-bit data, no parity, and 1 stopbit. You need to edit the line 'serial.Serial' with the relevant parameters to use this code for your device. Editing 'DATA_LENGTH' will change the rate at which the graph scrolls forward. Also, you'd need to change the 'command' that the device understands as 'send me data' (here it is the s character - line 'input'). Knowledge of the format of the returned data is also essential (here I turn ascii into 2 integers) line 'struct.unpack' - see here for help). Otherwise this should work with any device. Tested on Ubuntu 9.10 and 10.4 using serial port and USB-serial converters.
Sunday, 20 March 2011
Using cron to backup Thunderbird emails
My bash script (which I've saved as backup_emails.sh in my home folder and made executable) looks a little like this:
Then invoke in cron using:
add something like:
which does the backup at 04.30 every day
 set -x
  x=`date +%y%m%d.%H%M`
  tar zcf thunderb-mail-${x}.tgz ~/.mozilla-thunderbird
  mv thunderb-mail-${x}.tgz /media/MY_HARDDRIVE/email_backups/
Then invoke in cron using:
crontab -e
add something like:
30 4 * * * ~/./backup_emails.sh
which does the backup at 04.30 every day
Sunday, 20 June 2010
Batch GIMP script for auto-sharpen, white-balance and colour enhance
Like you, my point-and-shoot camera in auto-ISO mode often, if not always, gives me pictures which need a little adjustment to realise their full potential.
In GIMP, I usually use the 'auto white balance' option which usually gives great results. Often, I also use the 'auto color enhance' option and, occasionally, I use a simple filter to sharpen the features in the image.
Here's a GIMP script which will automate the process for a folder of pictures There are four input parameters. The first is the 'pattern' to find the files, e.g. "*.tiff" gives you all the tiff files in the directory. The next three inputs refer only to the sharpening filter. I use the (confusingly named) 'unsharp' filter which works by comparing using the difference of the image and a gaussian-blurred version of the image.
'radius' (pixels) of the blur (>1, suggested 5)
'amount' refers to the strength of the effect (suggested 0.5)
'threshold' refers to the pixel value beyond which the effects are applied (0 - 255, suggested 0)
These require a little bit of trial and error, depending on the type of picture. In the command line, the script is called like this:
An obligatory example. Before:
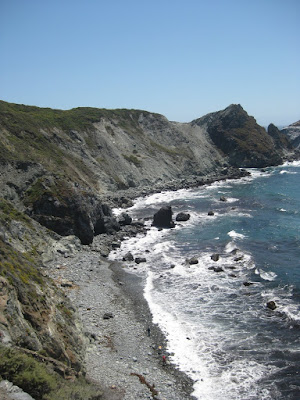
and after:
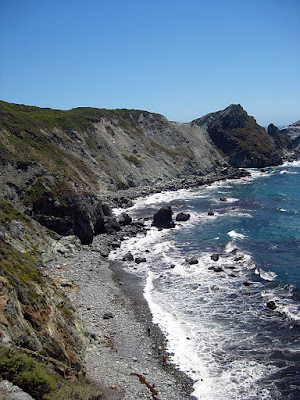
Enjoy!
In GIMP, I usually use the 'auto white balance' option which usually gives great results. Often, I also use the 'auto color enhance' option and, occasionally, I use a simple filter to sharpen the features in the image.
Here's a GIMP script which will automate the process for a folder of pictures There are four input parameters. The first is the 'pattern' to find the files, e.g. "*.tiff" gives you all the tiff files in the directory. The next three inputs refer only to the sharpening filter. I use the (confusingly named) 'unsharp' filter which works by comparing using the difference of the image and a gaussian-blurred version of the image.
'radius' (pixels) of the blur (>1, suggested 5)
'amount' refers to the strength of the effect (suggested 0.5)
'threshold' refers to the pixel value beyond which the effects are applied (0 - 255, suggested 0)
These require a little bit of trial and error, depending on the type of picture. In the command line, the script is called like this:
gimp -i -b '(batch-auto-fix "*.JPG" 5.0 0.5 0)' -b '(gimp-quit 0)'
An obligatory example. Before:

and after:

Enjoy!
Sunday, 6 June 2010
Convert movies to be compatible with ZEN X-Fi media player
Creative - another company which doesn't provide support for non-Windows users. Get with the times, losers!
The ZEN player needs a specific format of movie (bit-rate and aspect ratio). Here's how to do it with mencoder (available for free on all platforms)
The ZEN player needs a specific format of movie (bit-rate and aspect ratio). Here's how to do it with mencoder (available for free on all platforms)
mencoder 'MyMovie.avi' -oac mp3lame -lameopts cbr:mode=2:br=96 -af resample=44100 -srate 44100 -ofps 20 -ovc lavc -lavcopts vcodec=mpeg4:mbd=2:cbp:trell:vbitrate=300 -vf scale=320:240 -ffourcc XVID -o MyMovie4zen.avi
Granular Therapy
Here's a relaxing movie I just made of spinning modelled sand grains:
I'm not going to divulge the details of the model of how to create the sand grains (a current research project of mine). I can tell you I used these rather excellent functions for MATLAB:
Volume interpolation Crust algorithm, described more here
A toolbox for Multi-Parametric Optimisation
I used 'recordmydesktop' to capture the grains in my MATLAB figure window. It created an OGV format video (which I renamed to 'beautiful_grains.ogv'). I then used the following code to decode the video into jpegs
I needed to crop the pictures to just the grains, then turn the cropped pictures back into a video. I used this:
et voila! Now sit back with a cuppa and relax to those spinning grains.
I'm not going to divulge the details of the model of how to create the sand grains (a current research project of mine). I can tell you I used these rather excellent functions for MATLAB:
Volume interpolation Crust algorithm, described more here
A toolbox for Multi-Parametric Optimisation
I used 'recordmydesktop' to capture the grains in my MATLAB figure window. It created an OGV format video (which I renamed to 'beautiful_grains.ogv'). I then used the following code to decode the video into jpegs
 mkdir out_pics
 mplayer -ao null -ss 00:00:03 -endpos 50 beautiful_grains.ogv -vo jpeg:outdir=out_pics
I needed to crop the pictures to just the grains, then turn the cropped pictures back into a video. I used this:
 cd out_pics
 for image in *.jpg
 do
 # crop the image
 convert $image -crop 600x600+350+135 grains%05d.tiff
 done
 # make movie from the cropped tiffs
 ffmpeg -r 25 -i grains%05d.tiff -y -an spinning_grains_small.avi
et voila! Now sit back with a cuppa and relax to those spinning grains.
Saturday, 5 June 2010
Updated Power Spectrum from an Image
A while back I posted on using ImageMagick to do a full frequency-decomposition on an image, and create a power spectrum. It had several inaccuracies. Here's an update with how to do it better
First, you need to install a version of IM which is HDRI enabled (see here)
# test for valid version of Image Magick
# test for hdri enabled
#read $file, load and converting to greyscale
# crop image to smallest dimension
# crop image, and convert to png (why?)
# get data, find mean as proportion, convert mean to percent, and de-mean image
# pad to power of 2
# fft
# get spectrum
... but it's still not quite right. Any tips?
First, you need to install a version of IM which is HDRI enabled (see here)
# test for valid version of Image Magick
 im_version=`convert -list configure | \
  sed '/^LIB_VERSION_NUMBER /!d; s//,/; s/,/,0/g; s/,0*\([0-9][0-9]\)/\1/g'`
 [ "$im_version" -lt "06050407" ] && errMsg "--- REQUIRES IM VERSION 6.5.4-7 OR HIGHER ---"
# test for hdri enabled
 hdri_on=`convert -list configure | grep "enable-hdri"`
 [ "$hdri_on" = "" ] && errMsg "--- REQUIRES HDRI ENABLED IN IM COMPILE ---"
#read $file, load and converting to greyscale
convert $file -colorspace gray in_grey.tiff
# crop image to smallest dimension
min=`convert in_grey.tiff -format "%[fx: min(w,h)]" info:`
# crop image, and convert to png (why?)
convert in_grey.tiff -background white -gravity center -extent ${min}x${min} in_grey_crop.png
# get data, find mean as proportion, convert mean to percent, and de-mean image
 data=`convert in_grey_crop.png -verbose info:`
 mean=`echo "$data" | sed -n '/^.*[Mm]ean:.*[(]\([0-9.]*\).*$/{ s//\1/; p; q; }'`
 m=`echo "scale=1; $mean *100 / 1" | bc`
 convert in_grey_crop.png -evaluate subtract ${m}% in_grey_crop_dm.png
# pad to power of 2
 p2=`convert in_grey_crop_dm.png -format "%[fx:2^(ceil(log(max(w,h))/log(2)))]" info:`
 convert in_grey_crop_dm.png -background white -gravity center -extent ${p2}x${p2} in_grey_crop_dm_pad.png
# fft
convert in_grey_crop_dm_pad.png -fft in_ft.png
# get spectrum
convert in_ft-0.png -contrast-stretch 0 -evaluate log 10000 in_spec.png
... but it's still not quite right. Any tips?
Turn your OGV movie section into a cropped animated GIF
An example from a recent project
 # make directory for output jpg
 mkdir out_pics
 # section to the ogv video file into jpegs
 mplayer -ao null -ss 00:00:03 -endpos 50 beautiful_movie.ogv -vo jpeg:outdir=out_pics
 cd out_pics
 # loop over each image and crop into desired rectangle
 for image in *.jpg
 do
 convert $image -crop 600x600+350+135 "$image crop.tiff"
 done
 # turn into an animated gif
 convert -page 600x600+0+0 -coalesce -loop 0 *.tiff beautiful_animation.gif
Miscellaneous useful bash
For my benefit more than anything - things I use over and over again, but do not have the mental capacity to remember
# number of files in current directory
# check if you have a program installed
# only list the (sub-)directories in your current directory
# remove backup files
# use zenity get the directory where the file you want is
# list all txt files in this directory
# get this directory
# removes .txt (for example, for later use as start of filename)
# gets the rest of the file name
# turn string into (indexable) array
# get max and min dimensions of an image
# take away 1 from both
# number of files in current directory
ls -1R | grep .*.<file extension> | wc -l
# check if you have a program installed
aptitude show <name of program> | grep State
# only list the (sub-)directories in your current directory
ls -l | grep ^d
# remove backup files
find ./ -name '*~' | xargs rm
# use zenity get the directory where the file you want is
 zenity --info --title="My Program" --text="Select
 which directory contains the file(s) you want"
 export target_dir=`zenity --file-selection --directory`
# list all txt files in this directory
x=$( ls $target_dir | grep .*.txt |sort|zenity --list --title="Select" --column="coordinate file" )
# get this directory
export raw_dir=`zenity --file-selection --directory`
# removes .txt (for example, for later use as start of filename)
 str="$x"
 Var1=`echo $str | awk -F\. '{print $1}'`
# gets the rest of the file name
 str="$Var1"
 Var2=`echo $str | awk -F\- '{print $2}'`
# turn string into (indexable) array
 e=$(echo $mystring | sed 's/\(.\)/\1 /g')
 b=($e)
# get max and min dimensions of an image
 min=`convert image1.tiff -format "%[fx: min(w,h)]" info:`
 max=`convert image1.tiff -format "%[fx: max(w,h)]" info:`
# take away 1 from both
 min=$((min-1))
 max=$((max-1))
Unlock the power of ImageMagick to HDRI
My primary motivation to do this has been to use ImageMagick for Fast Fourier Transforms, which have a myriad of applicability in image processing and filtering
First, you have to install perlmagick. Using apt,
Then the perl libraries
Install the rather magnificent fftw libraries
wget the source code, untar, move it, cd home
Install (see here for instructions)
see also here for a bug fix, and also see here for instructions
To see whether the fft commands are working properly, you could issue the following:
see here for further information on fft transforms with, and watch your world spin faster
First, you have to install perlmagick. Using apt,
sudo apt-get install perlmagick
Then the perl libraries
sudo apt-get install libperl-dev
Install the rather magnificent fftw libraries
sudo apt-get install libfftw3-dev fftw-dev
wget the source code, untar, move it, cd home
 wget ftp://ftp.imagemagick.org/pub/ImageMagick/ImageMagick.tar.gz
 tar xvfz ImageMagick.tar.gz
 mv ImageMagick-6.6.0-8 $HOME
 cd $HOME/ImageMagick-6.6.0-8
Install (see here for instructions)
 make distclean
 ./configure --enable-hdri LDFLAGS='-L/usr/local/lib -R/usr/local/lib'
see also here for a bug fix, and also see here for instructions
make & sudo make install
make check
To see whether the fft commands are working properly, you could issue the following:
 if [ -s lena.png] #check to see if the file exists
 then
 # do fft and ifft roundtrip
 convert lena.png -fft -ift lena_mp_roundtrip.png
 else
 #first download
 wget http://optipng.sourceforge.net/pngtech/img/lena.png
 #then convert
 convert lena.png -fft -ift lena_mp_roundtrip.png
 fi
see here for further information on fft transforms with, and watch your world spin faster
Installing NCVIEW for Ubuntu
Recently I ran into problems installing NCVIEW, which is a tool for efficiently viewing the contents of a NetCDF data file. The problem was something to do with the X terminal. So here's how to install it from source:
 wget ftp://cirrus.ucsd.edu/pub/ncview/ncview-1.93g.tar.gz
 sudo apt-get install libxaw7-dev
 tar -xvvf ncview-1.93g.tar.gz
 cd ncview-1.93g/
 ./configure --x-libraries=/usr/X11R6/lib
 make
 make install
Monday, 8 June 2009
Quick tips for Ubuntu 9.04
One of the beauties of starting your OS afresh is, well, you get a new and better OS. Ubuntu 9.4 (or 'jaunty jackalope') is a slick version of my previous Ubuntu 8.04 ('hardy heron'). So far, I've ascertained that it looks better, it has better support for hardware, and it boots really fast.
One of the pains of starting your OS afresh is having to reinstall all your software and set your preferences. I thought I'd put a little 'as I do it' guide which may take some of the pain away. This list has a few of the 'biggies' and maybe a couple of items more suited to my personal taste, but what the hey!
1. configure the firewall
sudo apt-get install gufw
2. install wine (windows emulator, for those windows programs you cant live without - an ever decreasing number horray!)
sudo apt-get install wine
3. This one is crucial if you want to run java - it takes ages, and at the end when it installs java, you need to be able to use the tab and 'pg dwn' keys to get to the end of the license agreement
sudo apt-get install ubuntu-restricted-extras
4. VLC is still the best media player around
sudo apt-get install vlc
5. skype -
sudo wget http://www.medibuntu.org/sources.list.d/jaunty.list -O /etc/apt/sources.list.d/medibuntu.list
wget -q http://packages.medibuntu.org/medibuntu-key.gpg -O- | sudo apt-key add - && sudo apt-get update
sudo aptitude install skype
6. Google Earth (version 5) - install the binary from here. Right click - Properties - Permissions - make executable. Then double click, and it will install - easy! It will create a desktop icon which, by default, you cannot see because you do not have permission. In the terminal type (here, replace 'daniel' with your username):
cd ./Desktop
sudo chown daniel:daniel Google-googlearth.desktop
7. Expand the capabilities of nautilus file browser
sudo apt-get install nautilus-actions nautilus-gksu nautilus-image-converter nautilus-open-terminal nautilus-script-audio-convert nautilus-script-collection-svn nautilus-script-manager nautilus-sendto nautilus-share nautilus-wallpaper
8. Adobe AIR
wget http://airdownload.adobe.com/air/lin/download/latest/AdobeAIRInstaller.bin
chmod +x ./AdobeAIRInstaller.bin
./AdobeAIRInstaller.bin
9. Adobe acrobat reader
sudo gedit /etc/apt/sources.list
Add the below line in sources.list
deb http://archive.canonical.com/ubuntu jaunty partner
sudo apt-get update
sudo apt-get install acroread
G'night!
One of the pains of starting your OS afresh is having to reinstall all your software and set your preferences. I thought I'd put a little 'as I do it' guide which may take some of the pain away. This list has a few of the 'biggies' and maybe a couple of items more suited to my personal taste, but what the hey!
1. configure the firewall
sudo apt-get install gufw
2. install wine (windows emulator, for those windows programs you cant live without - an ever decreasing number horray!)
sudo apt-get install wine
3. This one is crucial if you want to run java - it takes ages, and at the end when it installs java, you need to be able to use the tab and 'pg dwn' keys to get to the end of the license agreement
sudo apt-get install ubuntu-restricted-extras
4. VLC is still the best media player around
sudo apt-get install vlc
5. skype -
sudo wget http://www.medibuntu.org/sources.list.d/jaunty.list -O /etc/apt/sources.list.d/medibuntu.list
wget -q http://packages.medibuntu.org/medibuntu-key.gpg -O- | sudo apt-key add - && sudo apt-get update
sudo aptitude install skype
6. Google Earth (version 5) - install the binary from here. Right click - Properties - Permissions - make executable. Then double click, and it will install - easy! It will create a desktop icon which, by default, you cannot see because you do not have permission. In the terminal type (here, replace 'daniel' with your username):
cd ./Desktop
sudo chown daniel:daniel Google-googlearth.desktop
7. Expand the capabilities of nautilus file browser
sudo apt-get install nautilus-actions nautilus-gksu nautilus-image-converter nautilus-open-terminal nautilus-script-audio-convert nautilus-script-collection-svn nautilus-script-manager nautilus-sendto nautilus-share nautilus-wallpaper
8. Adobe AIR
wget http://airdownload.adobe.com/air/lin/download/latest/AdobeAIRInstaller.bin
chmod +x ./AdobeAIRInstaller.bin
./AdobeAIRInstaller.bin
9. Adobe acrobat reader
sudo gedit /etc/apt/sources.list
Add the below line in sources.list
deb http://archive.canonical.com/ubuntu jaunty partner
sudo apt-get update
sudo apt-get install acroread
G'night!
Sunday, 7 June 2009
Never do this
sudo mv filename.file /bin/sh
Just don't mess with your bin/sh, and secondly don't attempt to restart your computer after you mess with your /bin/sh (which is the symbolic link to /bin/dash - low level crazy stuff which ordinarily you shouldnt ever know or care about, but which ensures your computer can do some vital things, like initialise).
This I discovered to my cost, and now I'm having to spend my weekend recovering all my files
This is a worrying and heartbreaking exercise, as I'm sure you'll understand - my computer is my livelihood and most of my hobbies, and I havent backed stuff up for ages, and recently I've been doing some cool stuff which exists only on the computer which now needs a complete OS overhaul!!
I'm writing this for instruction and warning rather than pity, you understand. You can't reboot, not even in any safe mode. I did a bit of internet forum research, and there was little guidance (mostly, instructions for windows users to use Ubuntu to recover their files, but not Ubuntu users to recover their files)
It turns out it's thankfully simple.
1. download an Ubuntu distro iso, and burn it to CD (instructions here and here)
2. place in optical drive of bummed out computer, and use BIOS to instruct it to boot from disk
3. select option to 'try Ubuntu without installing it on your computer' (or whatever the exact wording is - should be the first option in most versions)
4. then wait for it to boot - the OS running from the CD can recognise your hard-drive, but won't let you automatically access it. Open a terminal and type the following (assuming you want to access drive sda1 - you may want sdb1 or something):
for ease of copying and later access, change the permissions to all directories so anyone can have read/write privileges:
this will take a while if you have a lot of files and directories, but when it's done you're ready to plug in a large external hard drive, and save your precious files away - exactly what I'm doing now! The next step will be to reinstall ubuntu (I'm going to go for the latest - 9.04) and spend weeks reinstalling all my software and getting it to my specification - weeks I really don't have!
 sudo mkdir /media/ubuntu
 sudo mount -t ext3 /dev/sda1 /media/ubuntu
for ease of copying and later access, change the permissions to all directories so anyone can have read/write privileges:
 sudo su
 chmod 777 -R /media/ubuntu
this will take a while if you have a lot of files and directories, but when it's done you're ready to plug in a large external hard drive, and save your precious files away - exactly what I'm doing now! The next step will be to reinstall ubuntu (I'm going to go for the latest - 9.04) and spend weeks reinstalling all my software and getting it to my specification - weeks I really don't have!
Subscribe to:
Posts (Atom)